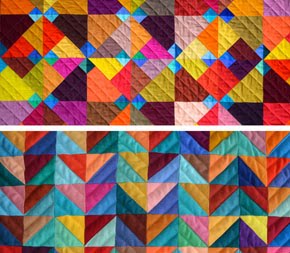
I've always been intrigued by Kumiko Sudo's Pine Cone quilt technique found in her book Omiyage (Contemporary Books). I decided to make a bag using this fabric scales technique. It gives a small 3d effect to fabrics and I really like it.
J'ai toujours été intriguée par la technique patchwork pomme de pin de Kumiko Sudo trouvée dans son livre Omiyage (Contemporary Books). J'ai décidé de faire un sac en utilisant cette technique d'écailles en tissu. Cela donne un petit effet de relief aux tissus et j'aime beaucoup.
I have plenty bags, but no large ones and I often end up using any plastic bag instead of my nice handmade bags. So this time I made a larger one: 35/45 cm (14" x 18").
J'ai beaucoup de sacs, mais aucun grand, je me résouds souvent à prendre n'importe quel sac en plastique plutôt qu'un de mes beaux sacs faits main. alors cette fois j'en fait un plus grand: 35/45 cm (14" x 18").
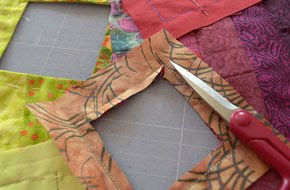
To begin, cut squares from two kinds of fabrics: some from decorative fabrics and some from the ground fabric, or here from the bag's fabric. I've chosen to make 7,5 cm (3") squares, but any size is fine.
Pour commencer, coupez des carrés dans deux sortes de tissus: des tissus décoratifs et le tissu de fond, qui correspond ici au tissu du sac. J'ai choisi ici de faire des carrés de 7,5 cm (3") mais toutes les grandeurs sont possible.
The secret is to sew one ground fabric with one decorative fabric together on two sides, leaving an opening at both ends, the width of the presser foot.
Le secret est de coudre un carré décoratif et un carré de fond ensemble sur deux côtés, en laissant une ouverture de la largeur du pied de biche aux deux extrémités.
To turn the corners here's the best way:
1. First put your thumb inside the corner.
2. Fold one side and hold it in place between thumb and index.
2. Fold second side.
3. Hold everything in place while turning the corner inside out. The tip is perfect!
Pour tourner les coins, voici la meilleure méthode:
1. D'abord enfilez votre pouce à l'intérieur du coin.
2. Pliez un côté et tenez le entre le pouce et l'index.
3. Repliez l'autre côté.
4. Tenez le tout en place pendant que vous retournez le coin. La pointe est parfaite!
Then you need to open the little "bag" and press it open.
Ensuite vous devez ouvrir le petit "sac" et le repasser ouvert.
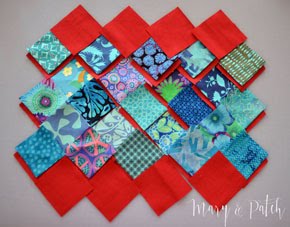
When you have enough scales, arrange them on the table. Add ground squares as shown if you want to make a surface. You can easily make it smaller or larger, as you wish. For this example, I've cut 23 decorative squares and 31 ground squares.
Be sure to make your surface large enough, as all the points will disappear!
Quand vous avez assez d'écailles, arrangez-les sur la table. Ajoutez des carrés de fond si vous avez envie de faire une surface. Vous pouvez facilement la faire plus petite ou plus grande selon votre désir. Pour cet exemple, j'ai coupé 23 carrés décoratifs, et 31 carrés de tissu de fond.
Réalisez une surface assez grande car toutes les pointes vont disparaître!
Start with a ground square and sew one scale.
Commencez par un carré de fond, et cousez une écaille.
Lift the scale and pin it to place the next one for sewing.
Soulevez l'écaille et épinglez-la pour placer la prochaine à coudre.
Start and end with back stitches.
Commencez et finissez avec des points arrière.
Sew your rows in logical order.
Cousez vos rangées de façon logique.
Done! You can now add a piece of fabric on top and bottom of your surface to make a bag as large as you want. For my bag the final rectangle is 35/45 cm (14" x 18").
Cut another rectangle from the ground fabric, same size, as well as two rectangles for the lining.
Fini! vous pouvez maintenant ajouter du tissu au dessus et au dessous de votre surface pour faire un sac de la grandeur désirée. Pour mon sac, le rectangle final est de 35/45 cm (14" x 18").
Coupez un autre rectangle de même taille dans le tissu de fond, de même que deux rectangles de tissu pour la doublure intérieure du sac.
Make handles, length and style according to your taste. You can add pockets to the inner lining rectangles.
Faites des poignées, style et grandeur selon vos goûts. Vous pouvez ajouter des poches sur les rectangles de la doublure intérieure.
Pin the handles on top of the outside rectangle (shorter side) and cover with an inside rectangle. Sew both rectangle on the short side only.
Sew the second outside rectangle to the lining rectangle, also on a short side.
Epinglez les poignées sur le haut d'un rectangle extérieur et couvrir d'un rectangle intérieur. Cousez seulement la couture du haut.
Coudre également le deuxième rectangle intérieur et extérieur avec une seule couture sur le plus petit côté.
You get two long rectangles. Pin them carefully and sew all around, leaving an opening on the shorter side of the lining fabric.
Vous obtenez deux longs rectangles. Epinglez-les soigneusement et cousez tout le tour en laissant une ouverture sur le plus petit côté de la doublure.
Turn the bag around through the opening.
Retournez le sac par l'ouverture.
Close the opening in the lining with a seam and push the lining inside the bag. You can stitch the edge of the bag if you wish.
Fermez l'ouverture de la doublure avec une couture et poussez la doublure dans le sac. Vous pouvez piquer le bord du sac si vous le désirez.